Life happens to you, not for you.
That's what happened to me. I have been busy with my newborn daughter, and that is why you haven't seen me here for a while.

Anyway, let's get into today's tutorial.
It's a tutorial showing you how to apply JavaScript concepts in your projects.
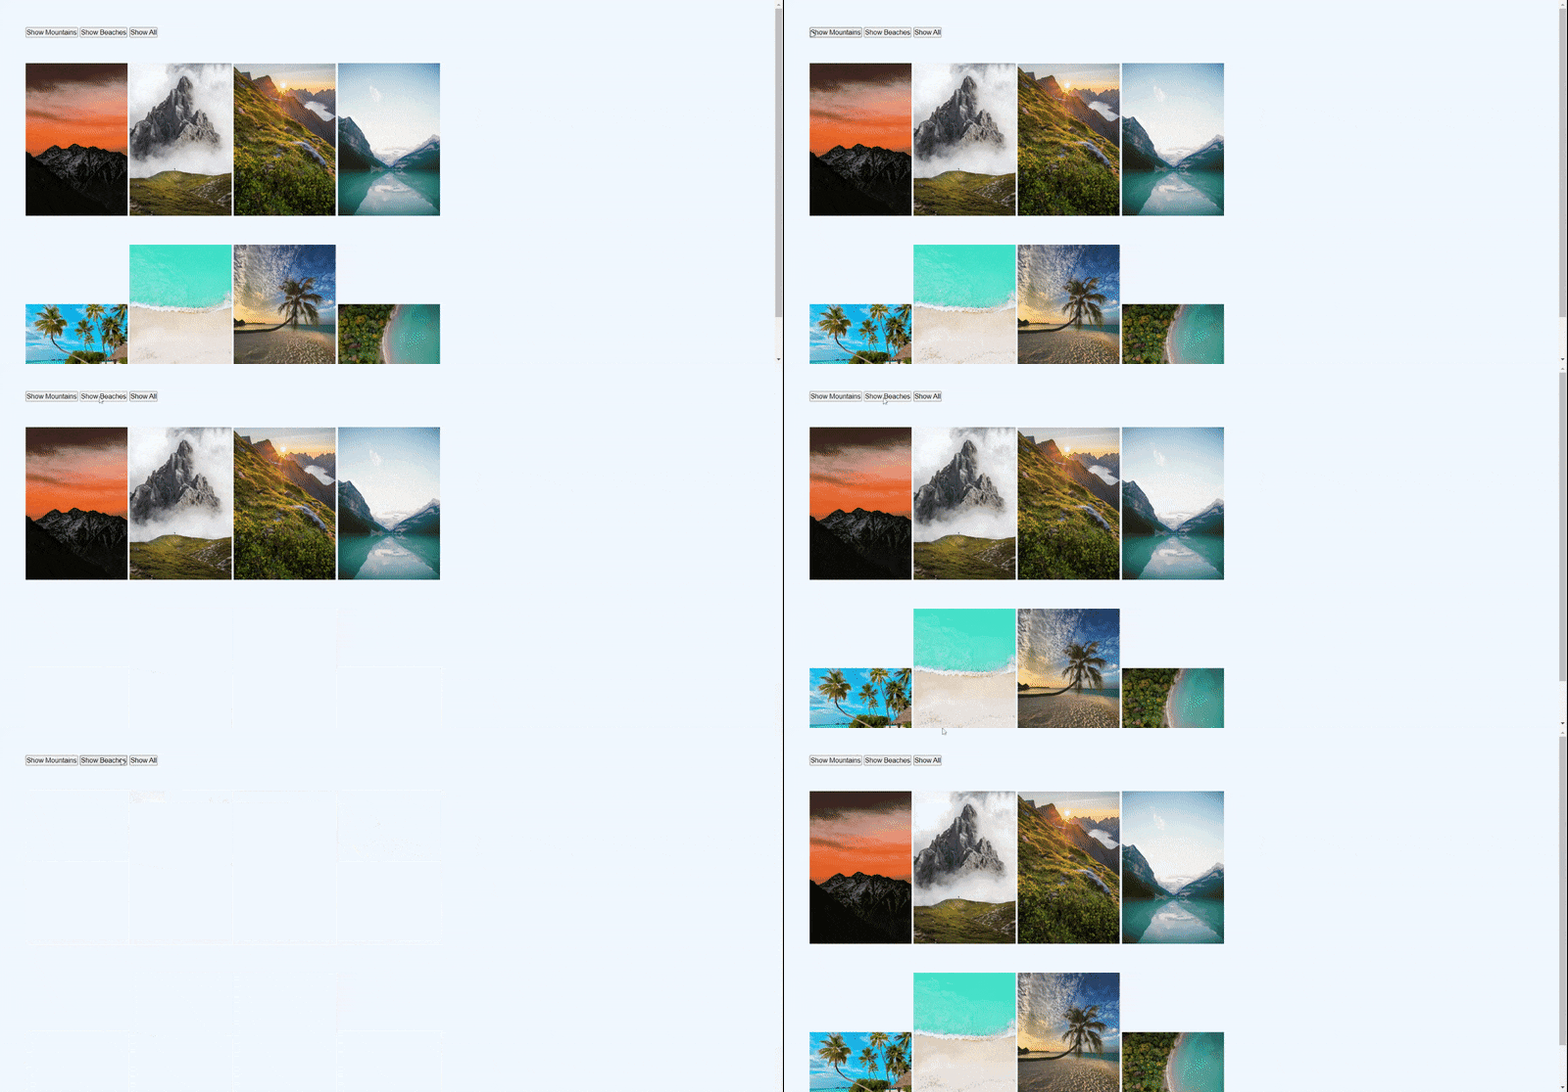
Here's what we are building today - an image filter.
When you click on a button, it filters a particular category and hides the other category(s)
Here's a glimpse of it.

Let's start with the HTML first. You can copy the below template to get started.
<!DOCTYPE html>
<html lang="en">
  <head>
    <meta charset="UTF-8" />
    <meta http-equiv="X-UA-Compatible" content="IE=edge" />

    <!-- viewport -->
    <meta name="viewport" content="width=device-width, initial-scale=1.0" />

    <!-- stylesheet -->
    <link rel="stylesheet" href="style.css" />

    <!-- title -->
    <title>Document</title>

    <!-- javascript -->
    <script src="script.js" defer></script>
  </head>
  <body>

  </body>
</html>
In the above template, I have already linked to the CSS and JavaScript files.
Also, I'm gonna provide you with starter files for this project(Link at the end). So that you can have a head start.
We will start with buttons first.
This project will have only three buttons. One for showing mountains, one for showing beaches, and one for showing all.
<!DOCTYPE html>
<html lang="en">
  <head>
    <meta charset="UTF-8" />
    <meta http-equiv="X-UA-Compatible" content="IE=edge" />

    <!-- viewport -->
    <meta name="viewport" content="width=device-width, initial-scale=1.0" />

    <!-- stylesheet -->
    <link rel="stylesheet" href="style.css" />

    <!-- title -->
    <title>Document</title>

    <!-- javascript -->
    <script src="script.js" defer></script>
  </head>
  <body>
    <button id="btn-one">Show Mountains</button>
    <button id="btn-two">Show Beaches</button>
    <button id="btn-three">Show All</button>
  </body>
</html>
Let's add some images to the HTML. All the images are wrapped with a section tag.
There will be only two categories of images- mountains and beaches. Each with four images.
<!DOCTYPE html>
<html lang="en">
  <head>
    <meta charset="UTF-8" />
    <meta http-equiv="X-UA-Compatible" content="IE=edge" />

    <!-- viewport -->
    <meta name="viewport" content="width=device-width, initial-scale=1.0" />

    <!-- stylesheet -->
    <link rel="stylesheet" href="style.css" />

    <!-- title -->
    <title>Document</title>

    <!-- javascript -->
    <script src="script.js" defer></script>
  </head>

  <body>

// buttons
    <button id="btn-one">Show Mountains</button>
    <button id="btn-two">Show Beaches</button>
    <button id="btn-three">Show All</button>

// images
    <section id="group-images" class="images">
      <img src="https://images.unsplash.com/photo-1508913449378-01b9b8174e46?ixlib=rb-1.2.1&ixid=MnwxMjA3fDB8MHxzZWFyY2h8MjZ8fG1vdW50YWluc3xlbnwwfHwwfHw%3D&auto=format&fit=crop&w=500&q=60 " alt="" data-set0 />
      <img src="https://images.unsplash.com/photo-1570641963303-92ce4845ed4c?ixlib=rb-1.2.1&ixid=MnwxMjA3fDB8MHxzZWFyY2h8N3x8bW91bnRhaW5zfGVufDB8fDB8fA%3D%3D&auto=format&fit=crop&w=500&q=60" alt="" data-set0 />
      <img src="https://images.unsplash.com/photo-1542224566-6e85f2e6772f?ixlib=rb-1.2.1&ixid=MnwxMjA3fDB8MHxzZWFyY2h8OXx8bW91bnRhaW5zfGVufDB8fDB8fA%3D%3D&auto=format&fit=crop&w=500&q=60" alt="" data-set0 />
      <img src="https://images.unsplash.com/photo-1439853949127-fa647821eba0?ixlib=rb-1.2.1&ixid=MnwxMjA3fDB8MHxzZWFyY2h8MTl8fG1vdW50YWluc3xlbnwwfHwwfHw%3D&auto=format&fit=crop&w=500&q=60" alt="" data-set0 /> <br>

      <img src="https://images.unsplash.com/photo-1590523741831-ab7e8b8f9c7f?ixlib=rb-1.2.1&ixid=MnwxMjA3fDB8MHxzZWFyY2h8Mnx8YmVhY2hlc3xlbnwwfHwwfHw%3D&auto=format&fit=crop&w=500&q=60" alt="" data-set1 >
      <img src="https://images.unsplash.com/photo-1600582910964-5b7c109e6868?ixlib=rb-1.2.1&ixid=MnwxMjA3fDB8MHxzZWFyY2h8Nnx8YmVhY2hlc3xlbnwwfHwwfHw%3D&auto=format&fit=crop&w=500&q=60" alt="" data-set1 >
      <img src="https://images.unsplash.com/photo-1590523278191-995cbcda646b?ixlib=rb-1.2.1&ixid=MnwxMjA3fDB8MHxzZWFyY2h8NXx8YmVhY2hlc3xlbnwwfHwwfHw%3D&auto=format&fit=crop&w=500&q=60" alt="" data-set1 >
      <img src="https://images.unsplash.com/photo-1543348750-466b55f32f16?ixlib=rb-1.2.1&ixid=MnwxMjA3fDB8MHxzZWFyY2h8MTR8fGJlYWNoZXN8ZW58MHx8MHx8&auto=format&fit=crop&w=500&q=60" alt="" data-set1 >
    </section>


  </body>
</html>
We are done with HTML. But if you take a close look at the end of each img tag, you will find a data attribute. For mountains data-set0 and for beaches data-set1.
I will explain why I chose data attribute over id or classes in a bit.
/* google fonts */
@import url("https://fonts.googleapis.com/css2?family=Poppins:wght@400;500;600&display=swap");

/* general css */
* {
  margin: 0;
  padding: 0;
  box-sizing: border-box;
}

html {
  scroll-behavior: smooth;
}

body {
  font-family: "Poppins", sans-serif;
  margin: 50px;
  background-color: aliceblue;
}

.images img {
  width: 200px;
  margin-top: 50px;
}
As for CSS, I'm using Poppins as a font, and the background color of Alice blue.
I'm setting all images to a width of 200px. So that, they won't take up the entire space.
If you want, you can copy the CSS code because there is not much in it.
So far, we are done with HTML and CSS and understand how each one works.
Let's dive into JavaScript and see how to add some functionality.
const btn = document.getElementById("btn-one");
const btn2 = document.getElementById("btn-two");
const btn3 = document.getElementById("btn-three");
We are starting off with selecting buttons. We are using getElementById to select the exact button and store it in a variable btn.
Here btn represents mountains, btn2 represents beaches, btn3 represents both mountains and beaches (All).
const mountains = document.querySelectorAll("[data-set0]");
const beaches = document.querySelectorAll("[data-set1]");
Here, the mountains variable holds all the pictures of mountains because we are selecting every image with data-set0.
The same applies to beach images also.
The basic idea is to display mountains if you click on the show mountains button, hide beaches, and vice-versa.
Also, if you click on show all, it displays both mountains and beaches.
We are going to use a click event listener along with for loops to achieve what we had in mind as shown below.
const btn = document.getElementById("btn-one");
const btn2 = document.getElementById("btn-two");
const btn3 = document.getElementById("btn-three");

const beaches = document.querySelectorAll("[data-set1]"); // it selects every image with data-set1
const mountains = document.querySelectorAll("[data-set0]"); // it selects every image with data-set0

btn.addEventListener("click", () => {
  for (let i = 0; i < beaches.length; i++) {
    beaches[i].style.display = "none"; // here i represents each image in the beaches
  }

  for (let i = 0; i < mountains.length; i++) {
    mountains[i].style.display = "inline-block";  // here i represents each image in the beaches
  }
});
Without loops, we have to manually set each item to display none like this:
 beaches[0].style.display = "none";
 beaches[1].style.display = "none";
 beaches[2].style.display = "none";
 beaches[3].style.display = "none";

// same for display inline-block too
So we use loops. For those who are not familiar with loops, read the below explanation.
Explanation: A quick refresher on for-loops:
In the above example, it starts at 0 and increases by one for every iteration until it reaches beaches.length and does whatever inside the curly bracket tell them to do.
First, we will add an event listener to the btn and use for loop inside the event listener to make beaches vanish and show mountains at the same time as shown above.
const btn = document.getElementById("btn-one");
const btn2 = document.getElementById("btn-two");
const btn3 = document.getElementById("btn-three");

const beaches = document.querySelectorAll("[data-set1]");
const mountains = document.querySelectorAll("[data-set0]");

btn.addEventListener("click", () => {
  for (let i = 0; i < beaches.length; i++) {
    beaches[i].style.display = "none";
  }

  for (let i = 0; i < mountains.length; i++) {
    mountains[i].style.display = "inline-block";
  }
});

btn2.addEventListener("click", () => {
  for (let i = 0; i < mountains.length; i++) {
    mountains[i].style.display = " none";
  }

  for (let i = 0; i < beaches.length; i++) {
    beaches[i].style.display = "inline-block";
  }
});
And for the last part, we are going to display both categories when you click the show all button as shown below.
For the show all button we are making both categories, display: inline-block in JavaScript.
The reason why I chose inline-block instead of block is each image takes a whole width while using block. I wanted them to appear in a line. So I used inline-block.
const btn = document.getElementById("btn-one");
const btn2 = document.getElementById("btn-two");
const btn3 = document.getElementById("btn-three");

const beaches = document.querySelectorAll("[data-set1]");
const mountains = document.querySelectorAll("[data-set0]");

btn.addEventListener("click", () => {
  for (let i = 0; i < beaches.length; i++) {
    beaches[i].style.display = "none";
  }

  for (let i = 0; i < mountains.length; i++) {
    mountains[i].style.display = "inline-block";
  }
});

btn2.addEventListener("click", () => {
  for (let i = 0; i < mountains.length; i++) {
    mountains[i].style.display = " none";
  }

  for (let i = 0; i < beaches.length; i++) {
    beaches[i].style.display = "inline-block";
  }
});

btn3.addEventListener("click", () => {
  for (let i = 0; i < beaches.length; i++) {
    beaches[i].style.display = "inline-block";
  }

  for (let i = 0; i < mountains.length; i++) {
    mountains[i].style.display = "inline-block";
  }
});

// data set1 = beaches, data-set0 = mountains
In the above code, if you make only beaches vanish when you click on the show mountains button and vice-versa.
Both categories will vanish after the first click.
The code for this looks like this:
btn.addEventListener("click", () => {
  for (let i = 0; i < beaches.length; i++) {
    beaches[i].style.display = "none";
  }


});

btn2.addEventListener("click", () => {
  for (let i = 0; i < mountains.length; i++) {
    mountains[i].style.display = " none";
  }


});

btn3.addEventListener("click", () => {
  for (let i = 0; i < beaches.length; i++) {
    beaches[i].style.display = "inline-block";
  }

  for (let i = 0; i < mountains.length; i++) {
    mountains[i].style.display = "inline-block";
  }
});
The result:

Why I chose data attributes over classes or ids?
Let's say you only use classes or ids. the classes and ids can be used in CSS and JS also. If you decide to change any class or id, you have to change it in all the files (HTML, CSS, and JS ).
By using the data attribute, you can use it for JavaScript only. So no more confusion.
Note to Readers:
- This tutorial is aimed at beginners who are trying to understand JavaScript concepts.
- Feel free to style it your way. Since this series is geared towards mostly JavaScript, I didn't do much styling.
- If you have any ideas that make this project better, comment your ideas below.
Final Thoughts:
I believe learning JavaScript concepts is not enough. We should apply these concepts in practice or on any projects to understand their real-world applications.
Hope you guys liked this tutorial. If you did, share and comment.
